K3s/loxilb in-cluster mode
Quick Start Guide with K3s and LoxiLB in-cluster mode
This document will explain how to install a K3s cluster with loxilb as a serviceLB provider running in-cluster mode.
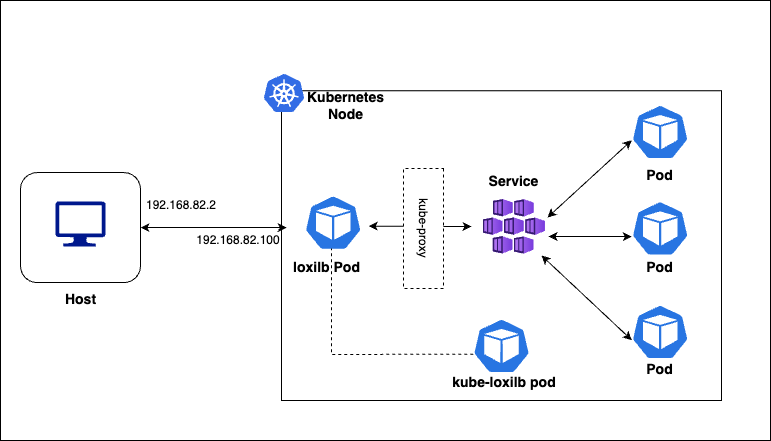
Topology
For quickly bringing up loxilb in-cluster and K3s, we will be deploying all components in a single node :

loxilb and kube-loxilb components run as pods managed by kubernetes in this scenario.
Setup K3s
# K3s installation
$ curl -sfL https://get.k3s.io | INSTALL_K3S_EXEC="server --disable traefik --disable servicelb --disable-cloud-controller --kube-proxy-arg metrics-bind-address=0.0.0.0 --kubelet-arg cloud-provider=external" K3S_KUBECONFIG_MODE="644" sh -

# Remove taints in k3s if any (usually happens if started without cloud-manager)
$ sudo kubectl taint nodes --all node.cloudprovider.kubernetes.io/uninitialized=false:NoSchedule-
How to deploy loxilb ?
loxilb can be deloyed by using the following command in the K3s node
sudo kubectl apply -f https://raw.githubusercontent.com/loxilb-io/loxilb/main/cicd/k3s-incluster/loxilb.yml
--bgp : Indicates that loxilb will be running with bgp instance and will be advertising the service IP to the external peer or loxilb-peer.
--egr-hooks: It is required for those cases in which workloads can be scheduled in the same nodes as loxilb nodes (most of the cases).
--blacklist=cni[0-9a-z]|veth.|flannel.|cali.|tunl.|vxlan[.]calico: It is mandatory for running in in-cluster mode. As loxilb attaches it's ebpf programs on all the interfaces but since we running it in the default namespace then all the interfaces including CNI interfaces will be exposed and loxilb will attach it's ebpf program in those interfaces which is definitely not desired. So, user needs to mention a regex for  excluding all those interfaces.
--fallback: It is an optional argument and ensures that egress traffic from the cluster to the internet or external destinations defaults to system masquerade rules if no other rules apply. LoxiLB can also be used as a HA capable egress on its own.
How to deploy kube-loxilb ?
kube-loxilb is used as an operator to manage loxilb.
wget https://raw.githubusercontent.com/loxilb-io/loxilb/main/cicd/k3s-incluster/kube-loxilb.yml
kube-loxilb.yaml
       args:
         #- --loxiURL=http://172.17.0.2:11111
         - --externalCIDR=192.168.82.100/32
         - --setRoles=0.0.0.0
         #- --monitor
         #- --setBGP
Apply after making changes (if any) :
sudo kubectl apply -f kube-loxilb.yaml
Create the service
sudo kubectl apply -f https://raw.githubusercontent.com/loxilb-io/loxilb/main/cicd/k3s-incluster/tcp-svc-lb.yml
Check the status
In k3s node:
## Check the pods created
$ sudo kubectl get pods -A
NAMESPACE     NAME                                      READY   STATUS    RESTARTS   AGE
kube-system   local-path-provisioner-6c86858495-snvcm   1/1     Running   0          4m37s
kube-system   coredns-6799fbcd5-cpj6x                   1/1     Running   0          4m37s
kube-system   metrics-server-67c658944b-42ptz           1/1     Running   0          4m37s
kube-system   loxilb-lb-8l85d                           1/1     Running   0          3m40s
kube-system   kube-loxilb-6f44cdcdf5-5fdtl              1/1     Running   0          2m19s
default       tcp-onearm-test                           1/1     Running   0          88s


## Check the services created
$ sudo kubectl get svc
NAME            TYPE           CLUSTER-IP    EXTERNAL-IP          PORT(S)           AGE
kubernetes      ClusterIP      10.43.0.1     <none>               443/TCP           5m12s
tcp-lb-onearm   LoadBalancer   10.43.47.60   llb-192.168.82.100   56002:30001/TCP   108s
$ sudo kubectl exec -it -n kube-system loxilb-lb-8l85d -- loxicmd get lb -o wide
|     EXT IP     | SEC IPS | PORT  | PROTO |         NAME          | MARK | SEL |  MODE  | ENDPOINT  | EPORT | WEIGHT | STATE  | COUNTERS |
|----------------|---------|-------|-------|-----------------------|------|-----|--------|-----------|-------|--------|--------|----------|
| 192.168.82.100 |         | 56002 | tcp   | default_tcp-lb-onearm |    0 | rr  | onearm | 10.0.2.15 | 30001 |      1 | active | 39:2874  |
Connect from host/client
$ curl http://192.168.82.100:56002
<!DOCTYPE html>
<html>
<head>
<title>Welcome to nginx!</title>
<style>
html { color-scheme: light dark; }
body { width: 35em; margin: 0 auto;
font-family: Tahoma, Verdana, Arial, sans-serif; }
</style>
</head>
<body>
<h1>Welcome to nginx!</h1>
<p>If you see this page, the nginx web server is successfully installed and
working. Further configuration is required.</p>

<p>For online documentation and support please refer to
<a href="http://nginx.org/">nginx.org</a>.<br/>
Commercial support is available at
<a href="http://nginx.com/">nginx.com</a>.</p>

<p><em>Thank you for using nginx.</em></p>
</body>
</html>