K0s/loxilb with kube-router
LoxiLB Quick Start Guide with k0s/kube-router
This guide will explain how to:
- Deploy a single-node K0s cluster with kube-router networking
- Expose services with loxilb as an external load balancer
Prerequisite(s)
- Single node with Linux
- Install docker runtime to manage loxilb
Topology
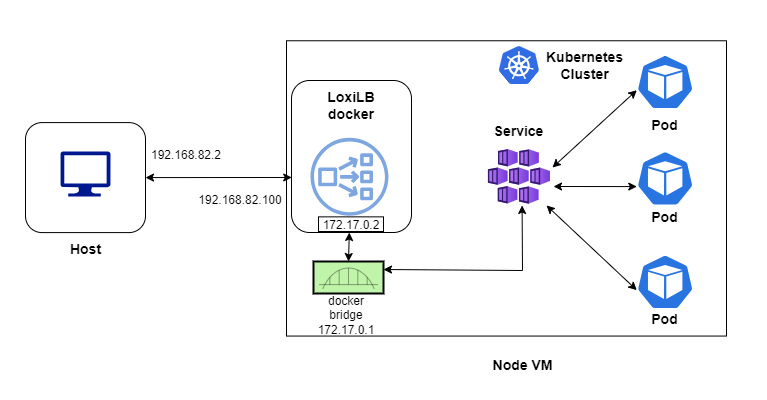
For quickly bringing up loxilb with K0s/kube-router, we will be deploying all components in a single node :

loxilb is run as a docker and will use macvlan for the incoming traffic. This is to mimic a topology close to cloud-hosted k8s where LB nodes run outside a cluster. loxilb can be used in more complex in-cluster mode as well, but not used here for simplicity.
Install loxilb docker
## Set underlying interface of the VM/cluster-node to promisc mode for mac-vlan to work
sudo ifconfig eth1 promisc

## Run loxilb
sudo docker run -u root --cap-add SYS_ADMIN --restart unless-stopped --privileged --entrypoint /root/loxilb-io/loxilb/loxilb -dit -v /dev/log:/dev/log  --name loxilb ghcr.io/loxilb-io/loxilb:latest

# Create mac-vlan on top of underlying eth1 interface
sudo docker network create -d macvlan -o parent=eth1 --subnet 192.168.82.0/24   --gateway 192.168.82.1 --aux-address 'host=192.168.82.252' llbnet

# Assign mac-vlan to loxilb docker with specified IP (which will be used as LB VIP)
# Please note that this node should already have an IP assigned belonging to the same subnet on underlying interface
sudo docker network connect llbnet loxilb --ip=192.168.82.100

# Add iptables rule to allow traffic from source/host IP(192.168.82.1) to loxilb
sudo iptables -A DOCKER -s 192.168.82.1 -j ACCEPT
All the above steps related to docker setup can be further automated using docker-compose.
Setup k0s/kube-router in single-node
#K0s installation steps
curl -sSLf https://get.k0s.sh | sudo sh
sudo k0s install controller --single
sudo k0s start
Check k0s status
sudo k0s status
How to deploy kube-loxilb ?
kube-loxilb is used to deploy loxilb with Kubernetes.
wget https://raw.githubusercontent.com/loxilb-io/kube-loxilb/main/manifest/ext-cluster/kube-loxilb.yaml
Change args in kube-loxilb.yaml
        args:
            - --loxiURL=http://172.17.0.2:11111
            - --externalCIDR=192.168.82.100/32
            - --setMode=1
Apply in k0s:
$ sudo k0s kubectl apply -f kube-loxilb.yaml
Create the service
$ sudo k0s kubectl apply -f https://raw.githubusercontent.com/loxilb-io/loxilb/main/cicd/docker-k0s-lb/tcp-svc-lb.yml
Check the status
In k0s:
$ sudo k0s kubectl get svc
NAME            TYPE           CLUSTER-IP      EXTERNAL-IP          PORT(S)           AGE
kubernetes      ClusterIP      10.43.0.1       <none>               443/TCP           80m
tcp-lb-onearm   LoadBalancer   10.43.183.123   llb-192.168.82.100   56002:30001/TCP   6m50s
$ sudo docker exec -it loxilb loxicmd get lb -o wide
|   EXT IP       | SEC IPS | PORT  | PROTO |         NAME          | MARK | SEL |  MODE  | ENDPOINT  | EPORT | WEIGHT | STATE  | COUNTERS |
|----------------|---------|-------|-------|-----------------------|------|-----|--------|-----------|-------|--------|--------|----------|
| 192.168.82.100 |         | 56002 | tcp   | default_tcp-lb-onearm |    0 | rr  | onearm | 10.0.2.15 | 30001 |      1 | active | 12:880   |
Connect from host/client
$ curl http://192.168.82.100:56002
<!DOCTYPE html>
<html>
<head>
<title>Welcome to nginx!</title>
<style>
html { color-scheme: light dark; }
body { width: 35em; margin: 0 auto;
font-family: Tahoma, Verdana, Arial, sans-serif; }
</style>
</head>
<body>
<h1>Welcome to nginx!</h1>
<p>If you see this page, the nginx web server is successfully installed and
working. Further configuration is required.</p>

<p>For online documentation and support please refer to
<a href="http://nginx.org/">nginx.org</a>.<br/>
Commercial support is available at
<a href="http://nginx.com/">nginx.com</a>.</p>

<p><em>Thank you for using nginx.</em></p>
</body>
</html>
All of the above steps are also available as part of loxilb CICD workflow. Follow the steps below to replicate the above (please note that you will need vagrant tool installed to run:
$ git clone https://github.com/loxilb-io/loxilb.git
$ cd cicd/docker-k0s-lb/

# To setup the single node k0s setup with kube-router networking and loxilb as external load balancer
$ ./config.sh

# To validate the results
$ ./validation.sh

# Cleanup
$ ./rmconfig.sh